An Inexpensive Studio, Part 1: Backgrounds

Your studio space can be in a garage, a spare room, or anywhere else you have enough space to set up backgrounds, lights, cameras, and subjects. How much space you will need depends on what you're going to be shooting -- a 12x12 room will probably do for many individual or small group portraits, while you'll need perhaps twice that much for full-length body shots and larger groups. Once you've picked a space, you need to be able to put up backgrounds to shoot in front of.
Before you start choosing backgrounds, though, you're going to need some way to hang them up. If your studio space is in your home or garage, one quick and easy way is to head down to the local hardware
store, and pick up a couple of closet rod brackets, as shown in the image. You can get two of them for
around $4 -- add a wooden closet rod (about $9), screw the brackets securely (into studs, if possible!)
onto your wall, and you're all set.
A more flexible setup is to buy a portable background stand/crossbar set, like the one shown here,
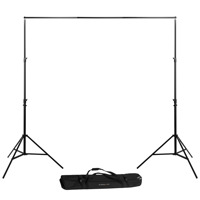
from Adorama. It comes with two light stands that support a variable-length crossbar, and is reasonably
priced. I personally use both -- I have permanent brackets in my studio space, and use the Adorama
crossbar from the kit in the studio, which frees up the two stands to be used as light stands. When I
need to take backgrounds on the road, I use the stands as intended, and it all fits nicely in the available
carrying case.
Once you've got something setup to hang your backgrounds from, you can start picking backgrounds to use!
The staple background of photographers for many years has been a roll of seamless paper; hang it up, roll
it out, and shoot away. They're relatively inexpensive (about $22 for a 53-inch wide roll, about $33 for
a 107-inch wide roll), last a long time, and roll up easily for storage when you're not using them. You
can order them from Adorama and other sources, and if you have a Calumet store near you they usually have
a good selection in-stock you can just pick up.

Another inexpensive option can be found at your local fabric store -- JoAnn Fabrics is my personal favorite. Head for their "remnants" section, which has leftovers and discontinued items, for some real
bargains. Get a piece of fabric wide enough for what you're going to shoot (for one-person portraits, four to six feet wide is usually plenty), and tall enough to hang from your background bar with a little
to spare. You can clamp the fabric to the bar easily, hiding the clamps behind the fabric, so that you don't have to sew in a "loop" to put the bar through. The image shown here was made with a piece of
gold-colored, patterned fabric I picked up from the remants section for about $8, and lit by shooting a strobe through a plastic imitation palm tree. The variety of inexpensive fabric backgrounds you can pick
up will amaze you -- if you've never browsed at the fabric store, give it a try!
On the more expensive end, you can spring for some pre-painted muslin or canvas backgrounds, like these at Adorama or these at Backdrop Outlet. Their initial cost is certainly higher than for fabric remnants, but they're very high quality and if cared for will last many, many years.

Finally, another option to consider is to use digital backgrounds -- and that doesn't mean you have to
shoot in front of a green or blue screen and use chroma-key software to drop backgrounds in. If you shoot in front of plain gray seamless paper, and light it evenly, there's a very simple 3-step way to drop in
backgrounds in PhotoShop that is quick, doesn't require tedious editing of masks, and blends nearly
seamlessly with your foreground subject. The before and after example shown here was shot this way, and
it took about 2 minutes to drop in the background digitally. I'll be doing a how-to post on this technique in the near future after the afforable studio setup series is done...and with digital backgrounds you have endless choices for backgrounds, any image you can create or imagine. In Part 2 of the series, I'll cover some inexpensive ideas for lighting setups...
Find the different LED Moving Head light ion our store. our store has different moving light i.e. LED spot moving head, LED beam moving head, LED moving head, unlimited rotation LED moving head light, LED beam moving head light etc. , having the best prices in the market
ReplyDeleteThanks for this blog Paul. Appreciate you for every single detail you have mentioned, the name, where I can find it, type and what not! Love the grey background idea for digital backdrops. Will certainly buy one and btw thanks for the tips too, pal.
ReplyDeleteThis was great to read, thanks
ReplyDelete